Seeed Studio’s Fusion PCB review

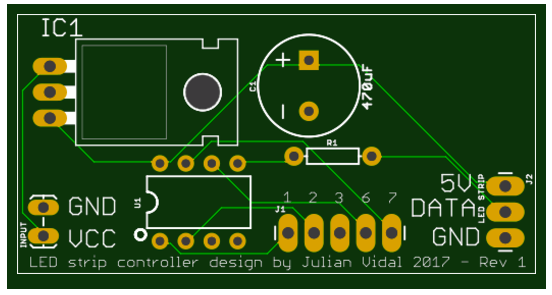
Today I’ll be reviewing a new PCB service from Seeed Studio called Fusion PCB. For that I will be making a simple acrylic LED display. Let’s see how it goes…

Disclaimer: I’ve been approached by the people at Seeed to review their Fusion PCB product. They gave me a coupon to try the service out for free in exchange for a review. So this is not a sponsored ad or anything like that. When they approached me, their exact words were “Just share your pcba shopping experience from Seeed Studio in the review as things really are”. Here’s how it went…

So what is their service all about anyways? The service is in reality three different services.

  1. PCB. You send them your GRBL files and they send you PCBs back.
  2. PCB Assembly. Combined with the above you can send them your BOM and they will assemble your PCB (solder the components to the board)
  3. PCB Stencil. You send them your GRBL files and they send you SMT stencils that you can use to transfer soldering paste to the exact location in your PCB.

The service that I tried was #1 in the above list. For that I initially created an air quality sensor circuit which turned out to be a little more complicated than I thought so I decided to lower my expectations a little bit and, instead, whipped up a quick ATTiny85 based RGB LED strip controller:

The circuit is extremely simple. There is a power input that goes through an LM7805 voltage regulator. This makes it easy to power the board; supply any voltage above 6V and below 23V and the ATTiny85 chip and LED strip will receive a steady-ish 5V. This is shown in the top right of the schematic.

There are also two connectors. The first one (top left) is for the LED strip. It contains VCC, GND, and DATA. There is a 470μF capacitor between VCC and GND to protect the strip from voltage spikes and there is a 560Ω resistor in the DATA line also to protect the strip. The second connector is not really needed but something that might be useful in the future. This connector exposes all the free pins on the ATTiny85 just in case I want to add a button, switch, or whatnot to the circuit and re-purpose it.

After creating the schematic I made a prototype to know everything was working as expected:

Once the schematic was complete and the board was routed on the free version of Eagle, the board looked like this (top and bottom layers overlaid):

You might be wondering what’s up with the seal in the back side of the PCB. Well… wonder away.

So armed with the finished board it was time to send it to Seeed for fabrication. On most PCB manufacturers this usually means generating GRBL files from your design. The only provider I am aware that does not require this is OSH Park (you just send them your Eagle files). Generating GRBL files is pretty much black magic if you are a rookie like I am. What I did in the past was look through the PCB manufacturer’s documentation for a file that I can load up on Eagle and use it to export my design with the proper rules. When I first tried this on Seeed, the damn file was very hard to find in their documentation and I just gave up to try another day. Apparently they had people working on the site during the time that I was working on this too because the next day when I went back to resume my search, there was a link to them right on the upload page which is in my opinion the best place to put them. Of course experienced engineers would be used to the whole GRBL shenanigans but the fact that Seeed took the time to make the process idiot-proof opens up a lot of possibilities for us rookies and of course opens up their business to a wider audience.

As you can see the options provided by Seeed are a lot. There is something for everyone:

Mind you, as soon as you deviate from the defaults, the prices go up pretty fast. Still, for the hobbyist, all the defaults are more than enough. In my case I changed the PCB color to black. OSH Park uses purple, Sparkfun uses red, everyone else in the planet uses green and I might as well try out something else.

One thing struck me as odd was the relationship between PCB quantity and price. I started playing around with the quantity selector and found that the price was not what I expected. You’d think that the more you order the cheaper they get, right? Well, no. I made a quick graph in Excel and confirmed that the price/quantity curve is not straight at all:

(open image in a new tab to see a higher resolution version).

It would seem that the cheapest prices (per board) happen when you order 10, 40, or over 100 units. I don’t know if this is an arbitrary decision to push consumers into buying specific quantities or if this has to do with the fabrication process itself. I ended up ordering 40 boards.

One really cool thing is that once you upload your zipped Gerber files you can preview them instantaneously in a web based viewer. So far Seeed is the only place that I’ve seen this done. OSH Park gives you a JPG rendering of what the board will look like too but I liked this better because you can toggle the visibility of the different layers. This is how the board looks like in the Seeed Gerber viewer:

Top view:

Bottom view:

Notice how the seal looks really pixelated? That must be one of the viewer’s quirks as the seal in the PCBs looks perfect.

So I finished the order and applied my coupon. Next up was choosing the shipping option. I was pleased to notice that they had DHL and FedEx as their carriers. I’ve had multiple bad experiences with the Chinese postal service where items were either never delivered or took months to arrive at their destination. For this order I chose DHL.

Production took 6 days and shipping to Canada took 2 days. All in all, 8 days after I clicked submit on their pay form I had the PCBs in my hand. Packaging was excellent. The boards came shrink wrapped and then wrapped in multiple layers of foam inside a cardboard box. This is what the shrink wrapped boards look like:

Here’s a view of the board itself:

(left: PCB top, right: PCB bottom)

Here’s a view of the assembled board:

The idea behind this was to make the circuit as compact as possible in order to be able to conceal the circuit inside a small box and be able to place a CNC engraved acrylic sign on top of it. I made such sign for my nephew (Plants vs Zombies fan) in my Shapeoko 3 CNC. This is how the acrylic sign looks like with the LED strip underneath it. Note, the enclosure is not shown (because I haven’t made it yet!).


On a side note, this acrylic seems to be a little too thick for this application (I used 1/2″). The ghosting you see is actually the reflection of the engraving on the back side of the acrylic. Maybe a narrower piece could work best.

To sum it up, I had a positive experience using their Fusion PCB service and will use them again. I liked the simplicity of it all and the huge range of options.